Community
Enterprise
Odoo Online
Effortlessly manage and update images in your Odoo records with our intuitive drag and drop widgets.

The Images Drag And Drop Widgets module is a state-of-the-art solution designed to enhance your Odoo experience by integrating modern, user-friendly drag and drop image widgets.
Whether you run an e-commerce site, a media portal, a real estate listing platform, or any business that requires the handling of multiple images per record, this module is built for you. Enjoy:
Online Stores: Showcase products with multiple images that can be easily updated on-the-fly.
Real Estate Platforms: Effortlessly manage property photos, floor plans, and virtual tours.
Agencies & Portfolios: Create visually appealing portfolios where media speaks louder than words.
With our module, say goodbye to tedious file uploads and hello to a more engaging user experience. It’s simple, robust, and designed to boost your productivity!
Follow these detailed steps to install the eis_drag_drop module:
addons
directory.
sudo systemctl restart odoo
sudo service odoo restart
eis_drag_drop) and
click install.
You can update any existing binary image field to use our drag and drop widget without altering your custom modules. Simply update your XML views by setting the widget attribute to:
                        <field name="image_field" widget="d_and_d_image" options="{
                            "image_size": "150x150",
                            "preview_image": "image_128",
                            "acceptedFileExtensions": "image/*",
                            "enableZoom": true,
                            "additionalStyles": "border:2px solid #007bff;"
                            }>
                            </field>
Options Explained:
image_size: Defines the display size of the widget.
Example: "150x150" sets the width to 150px and height to 150px.
preview_image: Specifies the field used for the image
preview. If not set, it defaults to the binary field name.
acceptedFileExtensions: Determines which image formats
can be uploaded.
enableZoom: If true, hovering over the image displays a
zoom popup.
additionalStyles: Custom CSS styles that are appended
to the widget's inline styles.
For One2Many fields, our widget transforms the standard image upload
into a dynamic drag and drop area.
Note:
The related model
must
have a Kanban
view defined that includes at least the
name
and
image
(or image_1920) fields.
Why a Kanban View? The Kanban view enables the widget to render image previews instead of just record IDs. Without it, you may only see numerical identifiers.
Form View for Videos & Manual Entry: If you wish to add videos or manually add images in the traditional way, ensure that your One2Many field is also accessible via a form view.
                        <page name="media" string="Extra Media">
                            <field name="media_ids" widget="d_and_d_images"
                            options="{
                            'childImageField': 'image_1920',
                            'extraData': {
                            'categ_id': 1,
                            'enable_zoom': true,
                            'previewImage': 'image_128',
                            'cssStyles': 'width:150px; height:200px; border-radius:15px;'
                            }
                            }"/>
                            </page>
childImageField: Specifies the field in the child model
where the binary image data is stored. This is mandatory for the
widget to function correctly. If not specified, image_1920 will be
used.
extraData: Allows you to pass additional data to the
child records. This can include:
categ_id: An example field that sets a default
category ID. This feature allows you to add any additional field
and its value if your model has a required field and without it,
it cannot create new records, or a field that you need to fill
with static data.
sale_ok: This is another example field and you can
pass any bool value if your required field is bool type
previewImage: Specifies a smaller image field to
use for previews, which is important if you want to show a
smaller size image to save bandwidth. This value should be used
if your model is inherited from
image.mixin
and you
want to display a smaller preview image.
cssStyles: Custom CSS styles for the image display.
Example:
"width:150px; height:200px; border-radius:15px;
                                    object-fit:cover;"
.
acceptedFileExtensions: Determines which file types are
acceptable for upload. Default is "image/*".
You can update any existing binary image field to use our drag and drop widget without altering your custom modules. Simply update your XML views by setting the widget attribute to:
                        <field name="image_field" widget="d_and_d_image" options="{
                            "image_size": "150x150",
                            "preview_image": "image_128",
                            "acceptedFileExtensions": "image/*",
                            "enableZoom": true,
                            "additionalStyles": "border:2px solid #007bff;"
                            }>
                            </field>
Options Explained:
image_size: Defines the display size of the widget.
Example: "150x150" sets the width to 150px and height to 150px.
preview_image: Specifies the field used for the image
preview. If not set, it defaults to the binary field name.
acceptedFileExtensions: Determines which image formats
can be uploaded.
enableZoom: If true, hovering over the image displays a
zoom popup.
additionalStyles: Custom CSS styles that are appended
to the widget's inline styles.
For One2Many fields, our widget transforms the standard image upload
into a dynamic drag and drop area.
Note:
The related
model
must
have a Kanban view defined that includes at least
the
name
and
image
(or
image_1920) fields.
Why a Kanban View? The Kanban view enables the widget to render image previews instead of just record IDs. Without it, you may only see numerical identifiers.
Form View for Videos & Manual Entry: If you wish to add videos or manually add images in the traditional way, ensure that your One2Many field is also accessible via a form view.
                        <page name="media" string="Extra Media">
                            <field name="media_ids" widget="d_and_d_images"
                            options="{
                            'childImageField': 'image_1920',
                            'extraData': {
                            'categ_id': 1,
                            'enable_zoom': true,
                            'previewImage': 'image_128',
                            'cssStyles': 'width:150px; height:200px; border-radius:15px;'
                            }
                            }"/>
                            </page>
childImageField: Specifies the field in the child model
where the binary image data is stored. This is mandatory for the
widget to function correctly. If not specified,
image_1920
will be used.
extraData: Allows you to pass additional data to the
child records. This can include:
categ_id: An example field that sets a default
category ID. This feature allows you to add any additional field
and its value if your model has a required field and without it,
it cannot create new records, or a field that you need to fill
with static data.
sale_ok: This is another example field and you can
pass any bool value if your required field is bool type.
previewImage: Specifies a smaller image field to
use for previews, which is important if you want to show a
smaller size image to save bandwidth. This value should be used
if your model is inherited from
image.mixin
and you
want to display a smaller preview image.
cssStyles: Custom CSS styles for the image display.
Example:
"width:150px; height:200px; border-radius:15px;
                                    object-fit:cover;"
.
acceptedFileExtensions: Determines which file types are
acceptable for upload. Default is "image/*".
Do not create the models described in the following example. Odoo already includes these models. This example is provided for educational purposes to help you understand the implementation.
product.template
Let's say we have a model
product.template
and we need to
add multiple image support to it. We will create a model
product.image
by inheriting from the
image.mixin
class. This way, we automatically get fields
like
image_1920
and other related fields for our model
product.image.
Here are the steps to achieve this:
product.image
Model:
Inherit from
image.mixin
to automatically get
image-related fields.
                                class ProductImage(models.Model):
                                    _name = 'product.image'
                                    _inherit = 'image.mixin'

                                    product_tmpl_id = fields.Many2one('product.template', string='Product Template')
                                    sequence = fields.Integer('Sequence')
                                    video_url = fields.Char('Video URL')
product.template
Model:
Add a One2Many field to link multiple images.
                                class ProductTemplate(models.Model):
                                    _inherit = 'product.template'

                                    product_template_image_ids = fields.One2many('product.image', 'product_tmpl_id',
                                    string='Images')
product.image:
Add a Kanban view with the necessary fields.
                                <record id="view_product_image_kanban" model="ir.ui.view">
                                    <field name="name">product.image.kanban</field>
                                    <field name="model">product.image</field>
                                    <field name="arch" type="xml">
                                    <kanban>
                                    <field name="id"/>
                                    <field name="name"/>
                                    <field name="image_1920" widget="image"/>
                                    <field name="sequence"/>
                                    </kanban>
                                    </field>
                                    </record>
product.image:
Add a form view with fields for video URL and image.
                                <record id="view_product_image_form" model="ir.ui.view">
                                    <field name="name">product.image.form</field>
                                    <field name="model">product.image</field>
                                    <field name="arch" type="xml">
                                    <form>
                                    <field name="id"/>
                                    <field name="name"/>
                                    <field name="video_url"/>
                                    <field name="image_1920" widget="image"/>
                                    </form>
                                    </field>
                                    </record>
product.template
Form View:
Add the One2Many field with the drag-and-drop widget.
                                <record id="view_product_template_form" model="ir.ui.view">
                                    <field name="name">product.template.form</field>
                                    <field name="model">product.template</field>
                                    <field name="inherit_id" ref="product.product_template_only_form_view"/>
                                    <field name="arch" type="xml">
                                    <form>
                                    <sheet>
                                    <group>
                                    <field name="product_template_image_ids" widget="d_and_d_images" options="{
                                    'childImageField': 'image_1920',
                                    'extraData': {
                                    'cssStyles': 'width:150px;height:150px;'
                                    }
                                    }"/>
                                    </group>
                                    </sheet>
                                    </form>
                                    </field>
                                    </record>
This guide outlines the necessary steps for integrating d_and_d_images widget for product
template, specifically when using the
website_sale
module, across Odoo 17 and 18. Please carefully follow the instructions for your respective Odoo
version to avoid conflicts and ensure proper functionality.
Odoo 17:
product.image
model or its views.
This model is already provided by the
website_sale
module in Odoo. Creating a duplicate will lead to conflicts.
product.template
form view.
. You will modify the form view
product.product_template_form_view
to integrate d_and_d_images customizations seamlessly with Odoo's core functionality.
product_template_image_ids
field in the inherited form view with d_and_d_images widget as described above to enhance
the product image management functionality.
Odoo 18:
Odoo 18 has modified the
product.image
Kanban view by removing certain fields. So, to make it compatible again with our d_and_d_images
widghet, here's how to adjust Odoo 18:
product.image
Kanban view.
website_sale.product_image_view_kanban. Add the necessary
id
and
name
fields back into the view to maintain existing functionality. That's it.
website_sale
in our eis_drag_drop module's
__manifest__.py
file to ensure proper loading order. You jsut need to uncomment the line having
website_sale with key depends and then comment the existing depend key.
data
key of the manifest to apply these changes automatically when your module is
installed or updated.
product.xml
file if you prefer more direct control over the modifications.
Our module has pre-configured these enhancements for you. To activate them, modify the
__manifest__.py
file to uncomment the dependency on
website_sale
and the reference to
/views/product.xml
in the
data
key. This ensures all functionalities are seamlessly integrated when you install or update the
module.
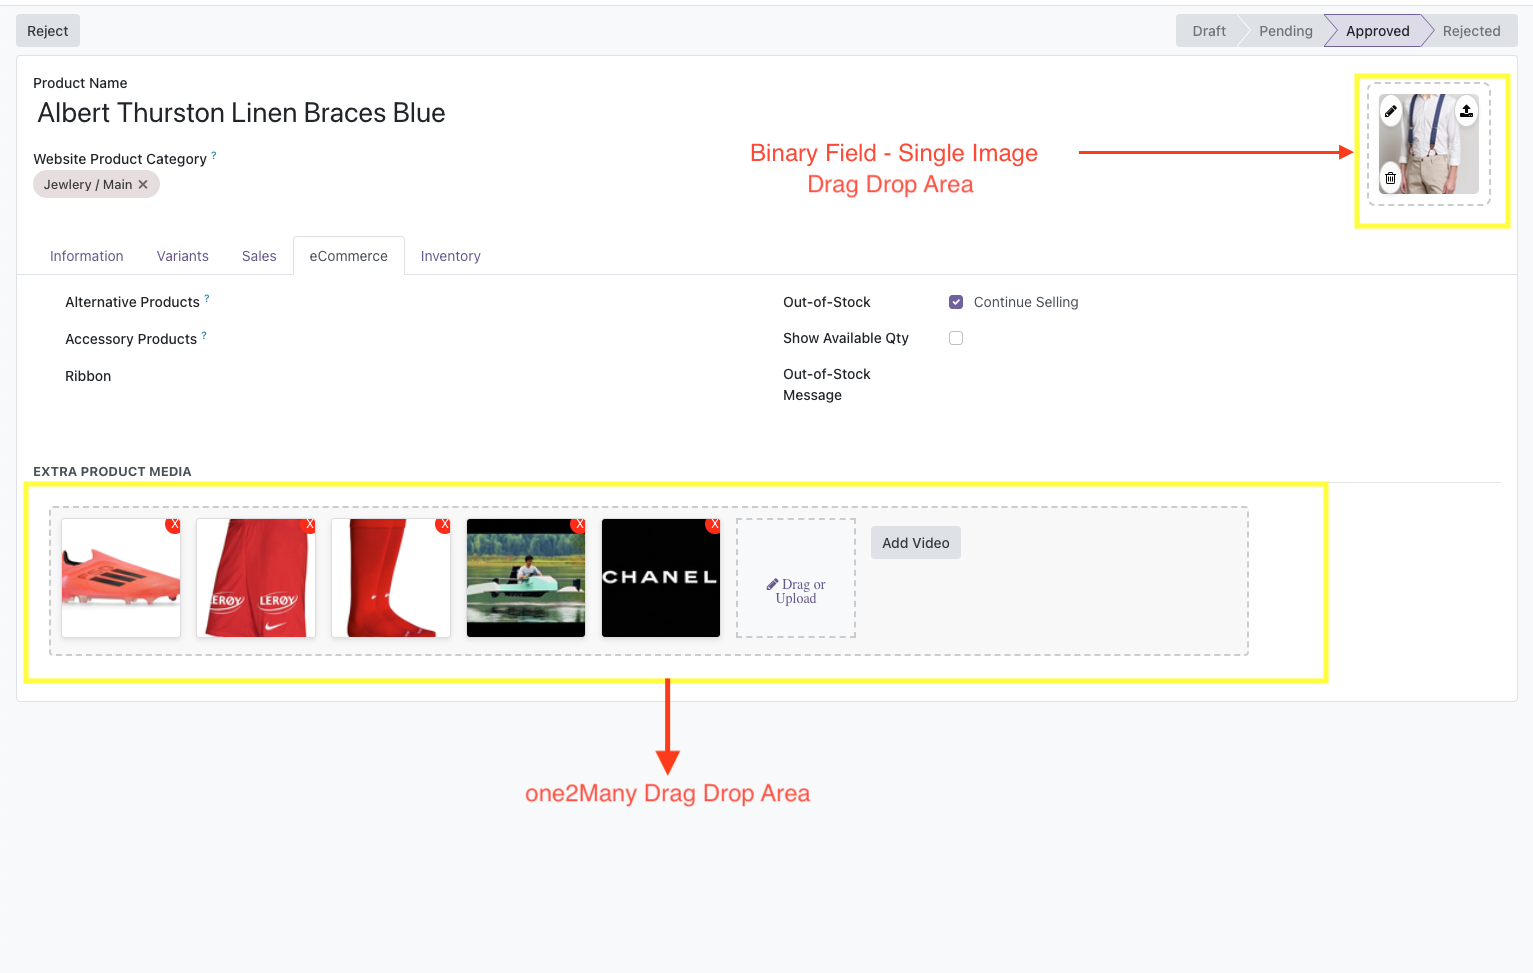
A clear view of the drag and drop widget areas for single binary image and for one2many images., allowing users to effortlessly update images.

In this screenshot, you can see a simple explaination of the view. Each record's thumbnail, have a small cross on top right corner to remove a record, view also display video thumbnail, and buttons.
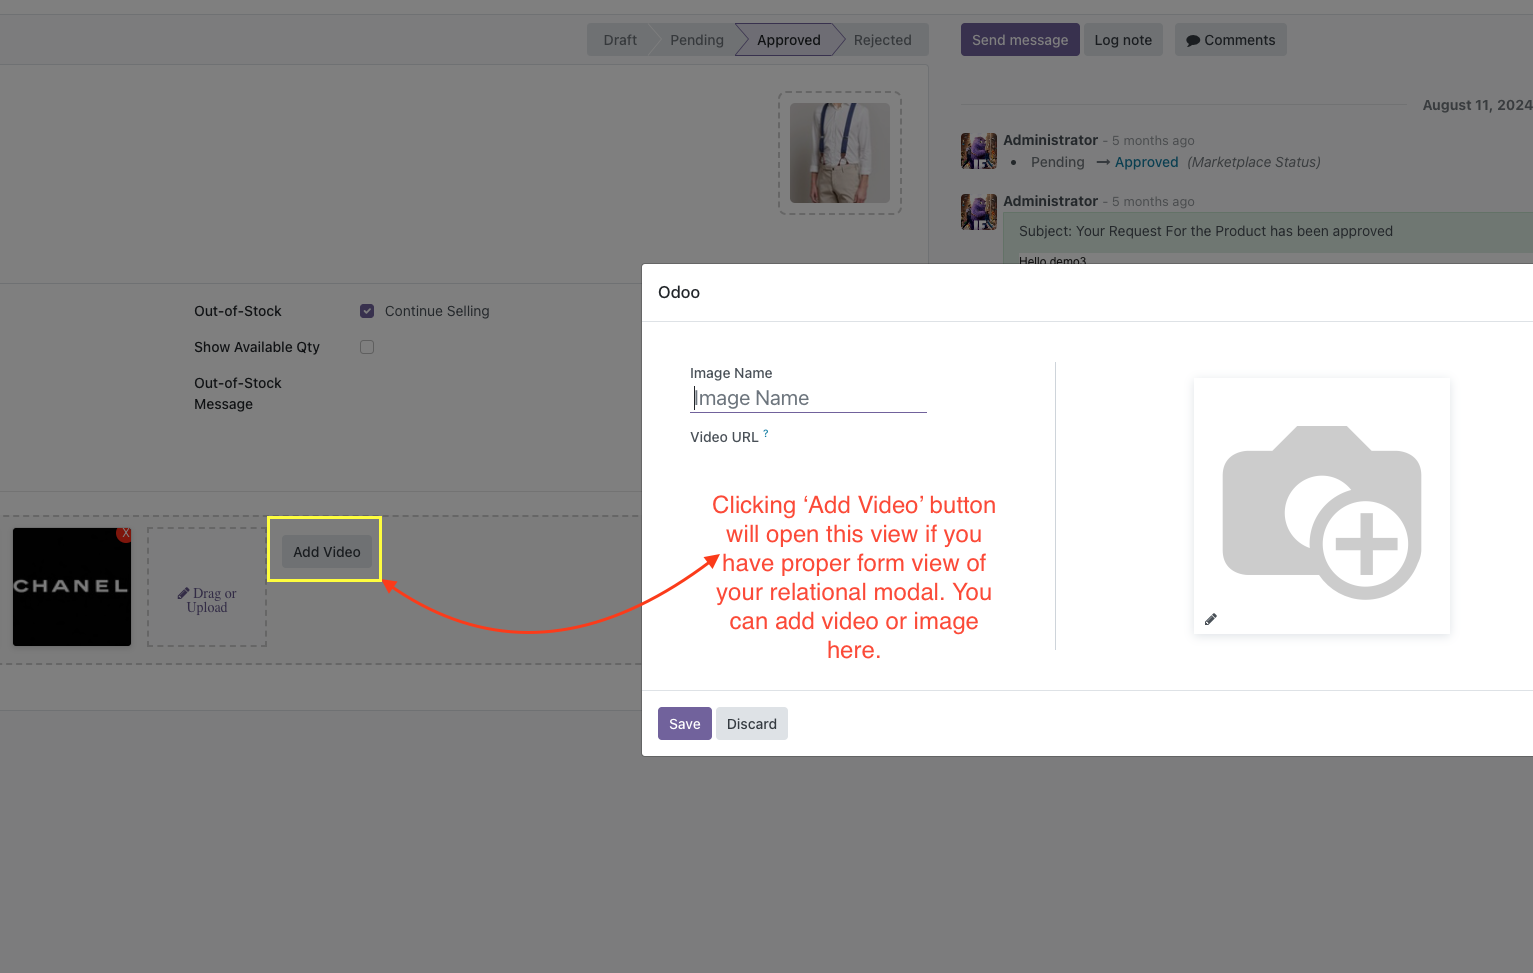
This screenshot illustrates how the one2many field widget
'Add Video'
button is working. You can access odoo
builtin method being used in website_sale module of odoo to add
extra media including videos or images.
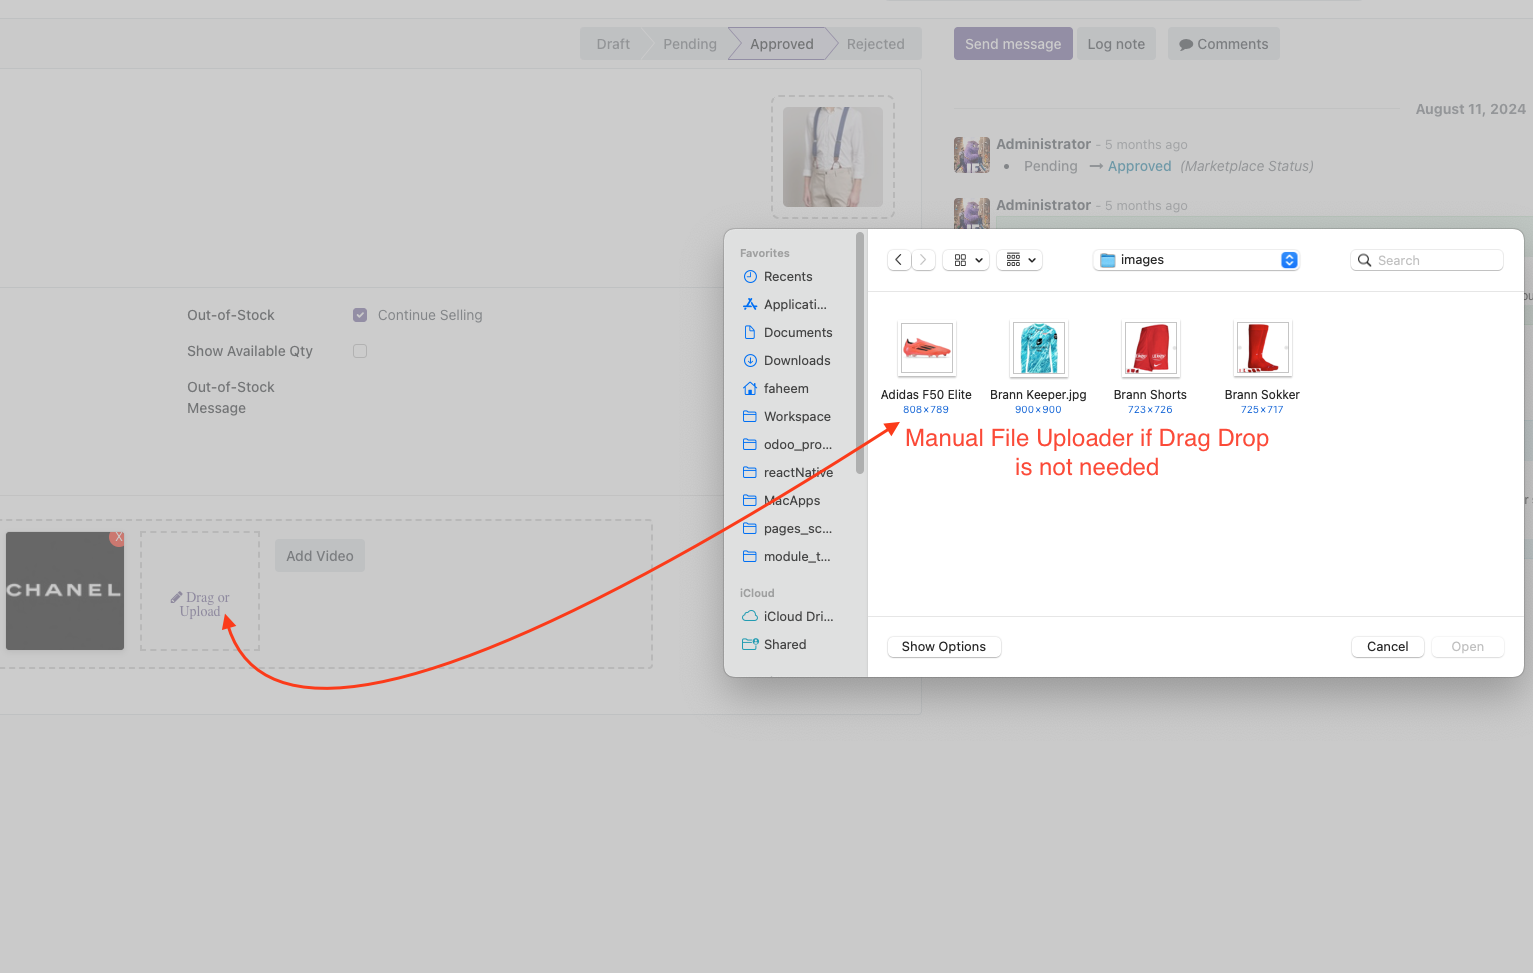
This screenshot illustrates how the one2many field widget manual upload button is working. If you want to upload images manually from file uploader, you can click on this button and it will open finder / file explorer for you. It will only allow images to upload with jpg, jpeg, png, svg etc
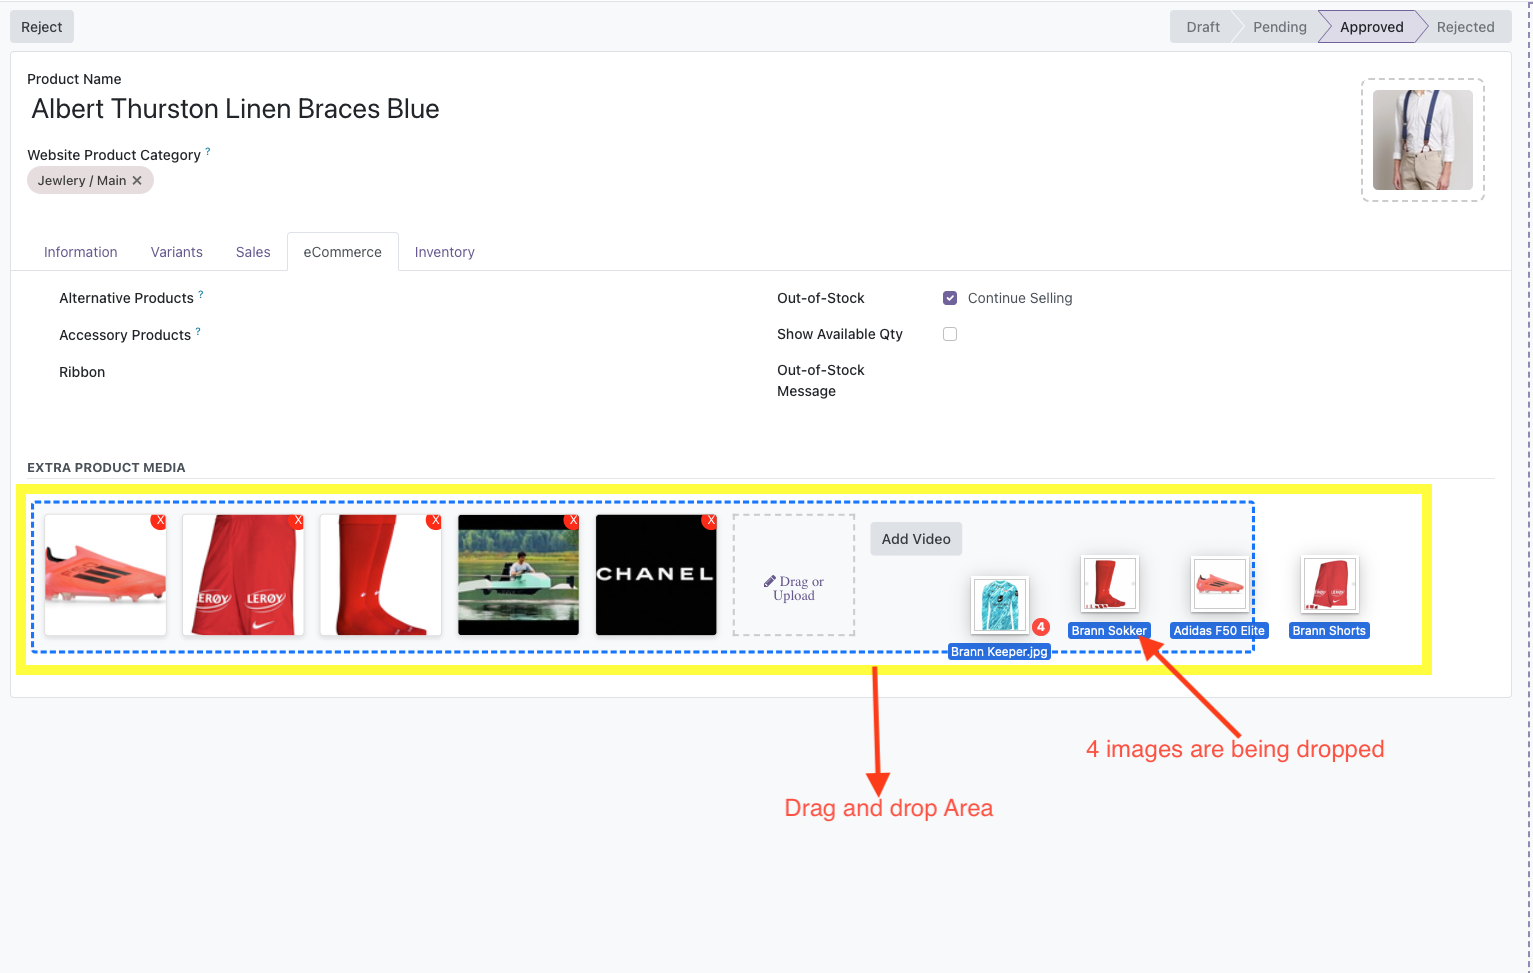
This screenshot illustrates how the one2many field is being used to drop 4 images into drag drop area. Notice the blue border that is highlighted when we dragged the images over it. As soon as we will drop the images, they will be uploaded automatically
Watch the video to see how it works.
Build custom Odoo modules and applications tailored to your business needs.
Learn More


name
and image/
image_1920
fields.
Below are examples of typical XML view definitions where the new drag and drop fields are highlighted:
This snippet shows how to integrate a single image drag and drop field into an Odoo form view:
                        <form string="Product Form">
                            <sheet>
                            <group>
                            <field name="name" />
                            <field name="description" />
                            <!-- Our new drag and drop image field is highlighted below -->
                             <field name="image_1920" widget="d_and_d_image"
                                class="oe_avator" options="{
                                "image_size": "200x200",
                                "preview_image": "image_128",
                                "acceptedFileExtensions": "image/*",
                                "enableZoom": true
                                }" />
                                <field name="price" />

                            </group>
                            </sheet>
                            </form>
Explanation:
This code defines a form view for a
product. The
product_image
field uses the
d_and_d_image
widget, which allows users to drag and
drop images. The
options
attribute specifies settings
like image size, preview image, accepted file extensions, and zoom
functionality.
This snippet demonstrates how to integrate a One2Many image drag and drop field into an Odoo form view:
                        <form string="Product Form">
                            <sheet>
                            <group>
                            <field name="name" />
                            <field name="description" />
                            <!-- One2Many drag and drop image field -->
                             <field name="product_images" widget="d_and_d_images"
                                options="{
                                "childImageField": "image_1920",
                                "extraData": {
                                "cssStyles": "width:150px;height:150px;"
                                }
                                }" />
                                <field name="price" />

                            </group>
                            </sheet>
                            </form>
Explanation:
This code defines a form view for a
product with a One2Many field product_images. The
d_and_d_images
widget allows users to drag and drop
multiple images. The
options
attribute specifies the
child image field and additional CSS styles for the image display.