Community
Enterprise
A Module for generating database backup and storing backup to multiple locations.

This module helps to generate backups of your databases automatically on regular interval of times. The generated backups can be stored into local storage, ftp server, sftp server, dropbox,nextcloud, Google Drive or Onedrive and Amazon S3. User can enable auto remove option to automatically delete old backups. User can enable email notification to be notified about the success and failure of the backup generation and storage. Using Automatic Database Backup module user can generate and store database backups to multiple location.
pip install dropbox
pip install pyncclient
pip install nextcloud-api-wrapper
pip install boto3
pip install paramiko
Available in Odoo 14.0 Community and Enterprise.
Generate database backups on regular intervals.
Generated backup can be stored to remote FTP server.
Generated backup can be stored to remote SFTP server.
Generated backup can be stored to google drive
Generated backup can be stored to Onedrive
Generated backup can be stored to Nextcloud
Generated backup can be stored to Amazon S3
Old backups files will be deleted automatically based on the obsolescence of backup.
An email notification send to user on successful backup generation also send an email notification when backup operation failed.
Got Setting --> Technical --> Backup Configuration to configure backups

Enter the database name and master password. specify backup type and destination. Enter the backup directory path, if directory does not exist new directory will be created.

Select backup destination as SFTP, enter credentials. Test connection button to check whether the connection is successful.

A successful message will be displayed if connection is successful

An error message will be displayed if test connection is failed

Select backup destination as FTP, enter credentials. Test connection button to check whether the connection is successful.

You'll need to create a new Google API project and enabling the Google Drive API, Go to the Google API Console and log into your account. While creating the project, for the Redirect URI restrictions, copy your Odoo database URI followed by /google_drive/authentication. Example:

ENABLE API AND SERVICES

ENABLE GOOGLE DRIVE API

Create Credentials, Follow the steps, select Website application for the Application Type.
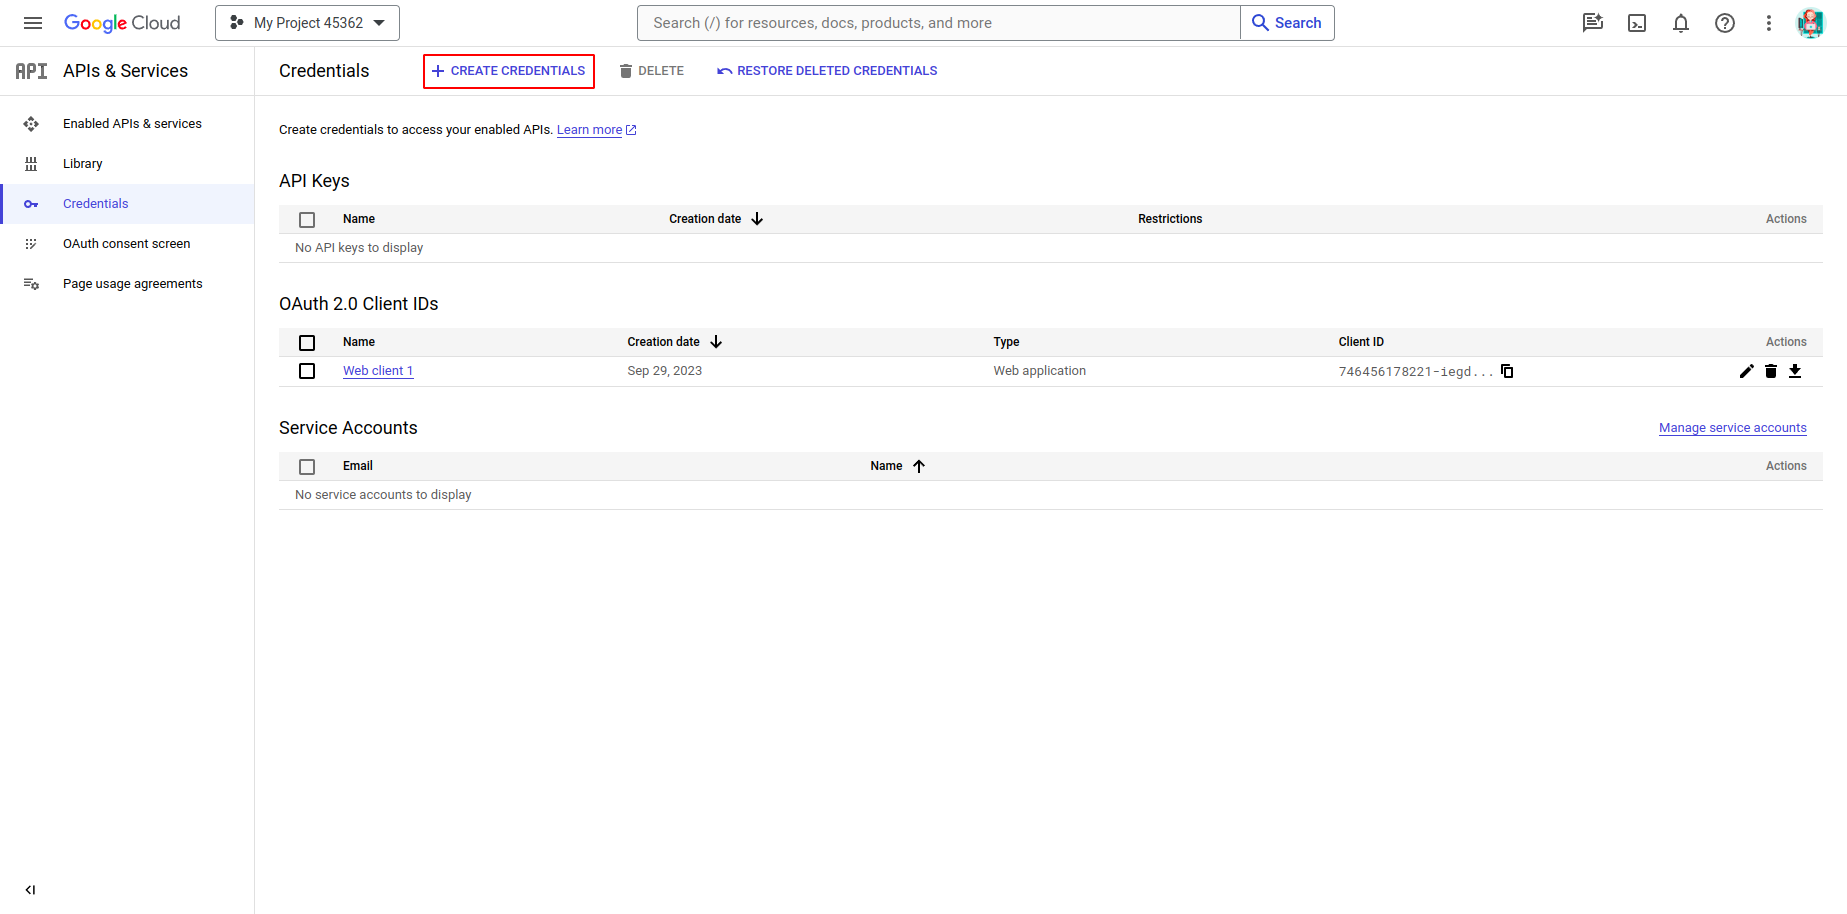
Under the Authorized JavaScript Origins section, click + Add URI and type your company's Odoo URL address. Under the Authorized redirect URIs section, click + Add URI and type your company's Odoo URL address followed by /google_drive/authentication. After all the steps are completed, A Client ID and Client secret will be given, copy the credentials

Go to the "OAuth consent screen", then Test users and click on 'ADD USERS' then add the user.

Configure Backup, Copy Client ID and Client Secret from Google Drive API Credentials page into their respective fields.

Setup Token, it will be redirected to an authorization page.


To get the app key and secret key go to the App Console. Create a new app
 Once you created the App , you can get the App key and App Secret as seen in
the screenshot
Once you created the App , you can get the App key and App Secret as seen in
the screenshot
 Choose your app's permission (files.content.write and files.content.read
permissions required).then click on Submit
Choose your app's permission (files.content.write and files.content.read
permissions required).then click on Submit
 Choose Dropbox as that of the backup destination. Enter the app secret and
key and dropbox Folder.
Choose Dropbox as that of the backup destination. Enter the app secret and
key and dropbox Folder.

Get the Authorization Code and click confirm.

Select Backup Destination as OneDrive. Enter the App key and App secret. you'll need to register a new app in the Microsoft Azure portal. While registering the app for the Redirect URI restrictions, copy your Odoo database URI followed by /onedrive/authentication. Example:

Copy the Client ID

Generate Client Secret.


Get OneDrive folder ID, where need to store the backup files.

Configure the Backup

Setup Token, it will be redirected to an authorization page.

To Create an account in Nextcloud go to
https://nextcloud.com/sign-up/, Enter Your Email Address and
Sign up .

You will be redirected to the page as shown in the screenshot, and it will ask you enter your email and password for the Nextcloud.

To get the Domain of the Nextcloud.Go to Settings in the Nextcloud and Click on Mobile & desktop. You will see server address Copy link and paste it in your Domain Name.

Select the backup destination as Nextcloud. Enter the Domain
Name, UserName, Password and Folder Name where you want to store
your backup on the NextCloud server. Check the Connect button
to check if the connection is successful.

Every day, a Scheduled Action will take place to store a backup
on the Nextcloud Server. The backup will be stored as the folder
name provided in the Folder ID field in Odoo.


To Create an account in Amazon S3 go to
https://portal.aws.amazon.com/billing/signup#/start/email, Enter
Your Email Address and Sign up .

After you created the account.You need to get the Access Key and Secret Key,To get these go the account Security credentials and go the Access Keys and create new access keys from there you will get Access Key and Secret Key.


Next You need to create a Bucket Folder in the Amazon S3.To do that Go the Services in the top right and go to Storage and S3 as shown in the Screen shot.

To create Bucket folder,Click on the Create bucket Button.

On Creating a Bucket Folder,Check the rules for naming the Bucket folder,and Select the region as well.After that click on the create Bucket Button in the bottom of the page.
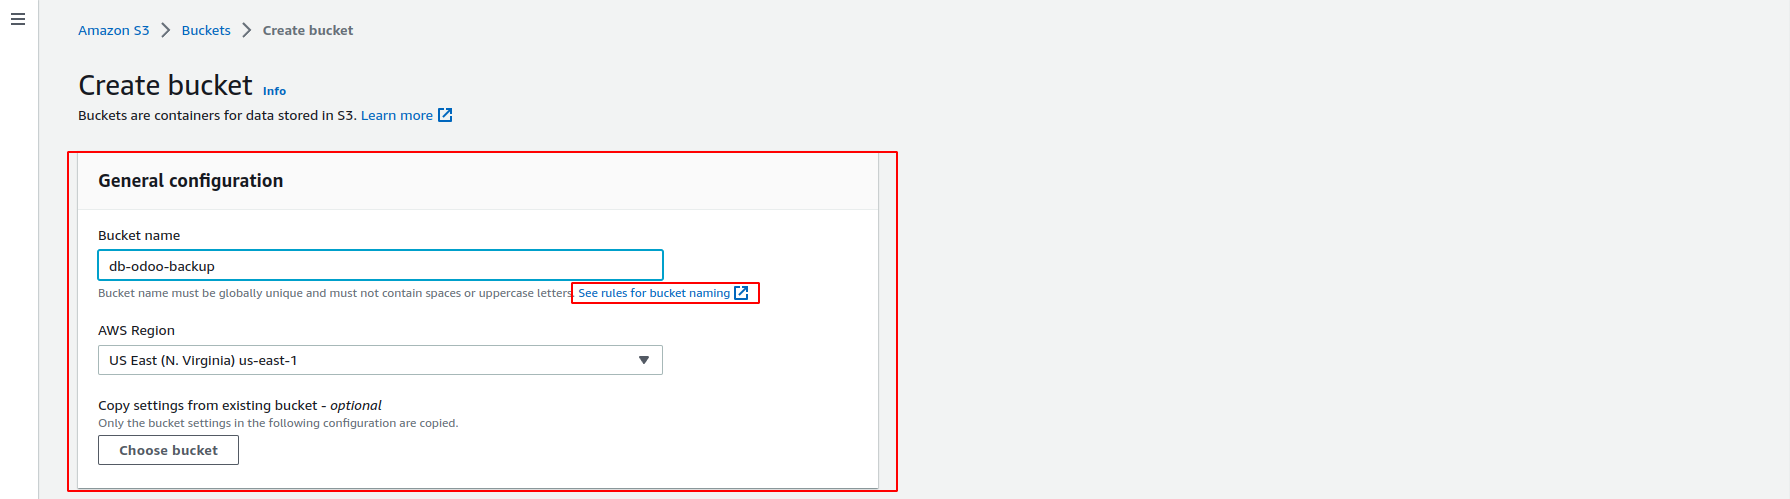
You will see the Bucket Folder as shown in the screenshot.

Select Backup Destination as Amazon S3. Enter the Amazon S3 Access Key,Amazon S3 Secret Key,Bucket Name->Bucket folder you have created in the Amazon S3 and the File Name->The Folder You want to store your backup in Amazon S3 Bucket Folder.Test connection button to check whether the connection is successful.

Every day, a Scheduled Action will take place to store a backup on the Amazon S3 Server. The backup will be stored as the folder name provided in the File Name field in Odoo.


Enable notify user option, and select a user to notify. An email
notification will be sent to the selected user on
backup successful and failure.


Enable the 'Automatic database Backup' scheduled action, and set up the execution interval. Based on the scheduled action setup, backups will be generated on regular intervals.


Easily procure and sell your products
Easy configuration and convivial experience
A platform for educational management
Plan, track and schedule your operations
Mobile friendly, awe-inspiring product pages
Keep track of services and invoice
Run your bar or restaurant methodically
An all-inclusive hotel management application


